
Dear Roundies,
As South Carolina shows its tropical side with muggy mornings and afternoon thunderstorms, our garden is doing well. The eggplants hang like purple comas throughout the garden, suggesting I pause in my daily labor and admire their bold, anime-like color. Most of the lettuce has bolted and is now almost as tall as me. Cucumbers hide their prickly faces behind leaves like an old man pulling the sheets over his face for a nap.
Continue Reading…
Posted 15 years, 11 months ago. 1 comment

I’ve always loved home-canned goods. When I was growing up, my mom stacked shelves full of them in the basement. Whenever I had to go down there, I would stop for a few moments and gaze at the sunset colored wall – the dusky yellow corn next to the subdued green beans, burnished orange carrots, and the mottled red salsas. My favorite was the jams. In the murky light of the basement, they glowed like buried treasure.
So, when strawberry season suddenly blossomed, I decided it was time to go pick those jewels…

This was my first time making jam. I expected it to be much harder, or at least more sweat inducing, than it actually was. That’s the great thing about freezer jam. Because it is preserved in the freezer, there’s no fuss with water baths and sealing jar lids. Just smoosh the berries (which is a very rewarding activity in itself), boil water with the pectin, then mix them together and freeze. How easy is that?
Too easy. With my first batch successfully setting on the counter, you’d think I’d be content for the day and go to bed. But no. There is a greed that befalls jam-jewel makers – well, this one at least. I couldn’t stop thinking of all the little extras I could add to my jam. Think of all the things strawberries pair well with and then imagine that in a jam. Strawberries with rhubarb. Strawberries with cinnamon. Strawberries with coconut. Strawberries with lime. All’s I can say is, it’s a good thing I didn’t pick that many strawberries, or else I’d have a freezer full of just jam right now.


In the end, I decided on a strawberry basil jam. I’d first tried this combination last summer in a strawberry watermelon basil salad that was refreshing but not overpowering. The basil added a slightly savory element to the otherwise sweet salad. I hoped the same would be true of my sugar laden jam. Due to the chopping method (chiffonade) the basil comes out in long green ribbons that twirl through the red jam like streamers, which I love.
Someday, when I’m lucky enough to have unlimited freezer space, I’d still like to try some of the other flavor combinations I mentioned. Especially the strawberry lime. In an effort to reduce the effect of the green eyed jam monster, I’ve decided in advance what flavor combinations I’d like to try in my other jams: cinnamon peach, apricot amaretto, and cherry balsamic.
Canning is a hopeful venture. Stirring a bowl of simmering fruit links me with all the cooks of times past who poured their hope for the future into jars. Like the ant in Aesop’s fable, they prepared for the winter while the hot sun still shone on their shoulders. The winter filled them with neither dread nor lassitude. In the winter, they could provide abundantly for their family as well as unexpected guests. They could look at a sky pregnant with snow and not despair.
While for me canning is less of a necessity than a hobby, I nevertheless felt like I was tapping into some of the pent up hope of generations before me. So often when I see trouble brewing, I cut my losses and move on. But canning reminded me that in the face of an uncertain future, there are things worth preserving – whether a bucket of scandalously red strawberries or a handful of bruised beliefs. Knowing that winters will come, whether the kind that bring snow or the kind that bring a heavy heart, canning embodies the hope that I will be able to meet it when it comes.
Hope is a thing with jar lids.
Gary Verdict: I had the strawberry basil jam on my waffle a few minutes ago, and it’s the first thing that’s made me consider not using maple syrup all the time.
Recipe
(taken from the SureJell insert)
2 pints strawberries (about 4 cups)
4 cups sugar
8-10 basil leaves (optional)
3/4 cup water
1 package SureJell
Wash and rinse containers with tight fitting lids. Hull the strawberries.

Then crush them using a potato masher. If you like chunkier jam, leave some almost whole berries. You should end up with 2 cups of crushed strawberries and juice. Use only exactly two cups in the recipe.Save the extra for something else- like strawberry shortcake! If making Strawberry Basil Jam, chiffonade basil leaves- stack 3-4 leaves and roll lengthwise, then chop stem to tip. It should make little ribbons of basil. To the strawberries, add the sugar and basil . Mix well. Let the mixture stand for 10 minutes.
Meanwhile, bring the water and SureJell to a boil, stirring constantly. Boil for 1 minute, still stirring. Remove from heat.
Stir the SureJell mixture into the strawberry mixture. Stir until the sugar is dissolved (when you can’t feel the sugar grains scraping the sides of the bowl)- about 3 minutes.

Pour the mixture into the prepared containers, leaving about 1/2 inch of space to allow for expansion during freezing. Cover. Let stand at room temperature for 24 hours until set.
Refrigerate up to 3 weeks. Or store in the freezer for up to a year.


Recipe:
Ingredients:
- 4 eggs
- 1/2 cup sugar
- 1 (15 ounce) can pumpkin
- 1/2 cup coconut oil
- 3 cups all-purpose flour
- 2 teaspoons baking soda
- 2 teaspoons baking powder
- 1 teaspoon ground cinnamon
- 1 teaspoon salt
- 2 cups semisweet chocolate chips
Directions:
- Preheat oven to 400 degrees F (200 degrees C). Lightly grease two 12 cup muffin pans, or line with paper baking cups.
- Beat the eggs in a large bowl, and mix in the sugar, pumpkin and oil.
- In a medium bowl, mix the flour, baking soda, baking powder, cinnamon and salt. Blend into the egg and pumpkin mixture. Fold in the chocolate chips. Transfer to the muffin pans.
- Bake in the preheated oven 15 to 20 minutes, or until a toothpick inserted in the center comes out clean. Remove muffins from pans, and cool on a wire rack.
My Thoughts:
These muffins tasted like that weird feeling you get when you run into a good school friend on summer break at the beach. All of your experiences with that friend occur in the context of studying, coffee shops, and sneakers. You almost don’t recognize her now, sprawled on a beach towel in a bathing suit.
This is how I felt about pumpkin…in May. I’m fond of pumpkin, but all of my dealings with the fregetable (is it a fruit or a vegetable? I never know..) have been in the chillier months. It is the one food I have probably always eaten in season without meaning to. Whether its in a bread, a soup, or a pie, pumpkin has always occurred in the context of burrowing in blankets, the great indoors, and mittens. So, to eat my pumpkin muffin, after being forced out of my sweltering kitchen onto the slightly less sweltering front porch with nary a mitten in sight, was disconcerting.
Once I recovered from my surprise, however, the pumpkin chip muffin and I got on quite well. They were blissful right out of the oven. (What muffins aren’t?) The next day they were even better, as the flavors had melded. And there was no danger of the chocolate chips burning my tongue. We ate them as quick snacks or as breakfast. They are quite good toasted with a pat of butter.
I tried a couple new things in this recipe. I used coconut oil instead of canola or vegetable oil. I used rapadura (whole cane sugar) instead of white sugar. I’m generally not one to try to make dessert easier on a guilty conscience. If you’re going to have a cookie, make it the best cookie you’ve ever had. So just what’s with the coconut oil and rapawhata? For now, let it be known that I made the substitution on the basis of health and taste. More detail belongs in the next post, which is still in the oven…
Gary Verdict:
I never counted the number of muffins left throughout the week, out of fear of being disappointed. As I suspected, they were gone much sooner than they should have been. I like chocolate, and muffins. And these were very good.
Posted 16 years, 1 month ago. 1 comment

Recipe:
It is important to work the dough as little as possible—work quickly and knead and fold the dough only the number of times called for. The butter should be frozen solid before grating. In hot or humid environments, chill the flour mixture and work bowls before use. While the recipe calls for 2 whole sticks of butter, only 10 tablespoons are actually used (see step 1). If fresh berries are unavailable, an equal amount of frozen berries (do not defrost) can be substituted. An equal amount of raspberries, blackberries, or strawberries can be used in place of the blueberries. Cut larger berries into 1/4- to 1/2-inch pieces before incorporating. Refrigerate or freeze leftover scones, wrapped in foil, in an airtight container. To serve, remove foil and place scones on a baking sheet in a 375-degree oven. Heat until warmed through and recrisped, 8 to 10 minutes if refrigerated, 16 to 20 minutes if frozen. See final step for information on making the scone dough in advance.
Makes 8
| 16 |
tablespoons unsalted butter (2 sticks), frozen whole (see note above) |
| 1 1/2 |
cups fresh blueberries (about 7 1/2 ounces), picked over (see note) |
| 1/2 |
cup whole milk |
| 1/2 |
cup sour cream |
| 2 |
cups unbleached all-purpose flour (10 ounces), plus additional for work surface |
| 1/2 |
cup sugar (3 1/2 ounces), plus 1 tablespoon for sprinkling |
| 2 |
teaspoons baking powder |
| 1/4 |
teaspoon baking soda |
| 1/2 |
teaspoon table salt |
| 1 |
teaspoon grated lemon zest |
See Illustrations Below:
1. Adjust oven rack to middle position and heat oven to 425 degrees. Score and remove half of wrapper from each stick of frozen butter. Following photo at left, grate unwrapped ends on large holes of box grater (you should grate total of 8 tablespoons). Place grated butter in freezer until needed. Melt 2 tablespoons of remaining ungrated butter and set aside. Save remaining 6 tablespoons butter for another use. Place blueberries in freezer until needed.
2. Whisk together milk and sour cream in medium bowl; refrigerate until needed. Whisk flour, 1/2 cup sugar, baking powder, baking soda, salt, and lemon zest in medium bowl. Add frozen butter to flour mixture and toss with fingers until thoroughly coated.
3. Add milk mixture to flour mixture; fold with spatula until just combined. With rubber spatula, transfer dough to liberally floured work surface. Dust surface of dough with flour; with floured hands, knead dough 6 to 8 times, until it just holds together in ragged ball, adding flour as needed to prevent sticking.
4. Roll dough into approximate 12-inch square. Following illustrations, fold dough into thirds like a business letter, using bench scraper or metal spatula to release dough if it sticks to countertop. Lift short ends of dough and fold into thirds again to form approximate 4-inch square. Transfer dough to plate lightly dusted with flour and chill in freezer 5 minutes.
5. Transfer dough to floured work surface and roll into approximate 12-inch square again. Sprinkle blueberries evenly over surface of dough, then press down so they are slightly embedded in dough. Using bench scraper or thin metal spatula, loosen dough from work surface. Roll dough, pressing to form tight log. Lay seam-side down and press log into 12 by 4-inch rectangle. Using sharp, floured knife, cut rectangle crosswise into 4 equal rectangles. Cut each rectangle diagonally to form 2 triangles and transfer to parchment-lined baking sheet.
6. Brush tops with melted butter and sprinkle with remaining tablespoon sugar. Bake until tops and bottoms are golden brown, 18 to 25 minutes. Transfer to wire rack and let cool 10 minutes before serving.
To Make Ahead:
After placing the scones on the baking sheet, either refrigerate them overnight or freeze. When ready to bake, for refrigerated scones, heat oven to 425 degrees and follow directions in step 6. For frozen scones, heat oven to 375 degrees, follow directions in step 6, and extend cooking time to 25 to 30 minutes.
Step-by-Step: Grating Butter

Use the wrapper to hold the frozen butter while grating it on the large holes of a box grater. Grate 4 tablespoons from each stick of butter. |
Step-by-Step: Folding and Shaping the Scones
My thoughts:
How could you not love these?

Inside a crispy crust are buttery layers enfolding juicy blueberries that pop in your mouth like fireworks. I don’t think I’ve ever worked with a more helpful recipe. It felt like having a pastry chef with me in the kitchen.
Some other filings I’d like to try:
- Candied ginger
- Strawberry
- Rosemary and ham
Gary verdict: “They were all gone before I had even a tenth of what I could’ve eaten.”
Posted 16 years, 2 months ago. Add a comment

Ingredients:
- 2 large red or golden beets (about 14 ounces)
- 1/2 cup fresh whole-milk ricotta cheese
- 2 tablespoons dried breadcrumbs
- 1 package all natural won ton wrappers
- 1/2 cup (1 stick) butter
- 1 tablespoon poppy seeds
- Freshly grated Parmesan cheese
Preparation:
Preheat oven to 400°F. Wrap beets individually in foil; place on baking sheet. Roast until tender when pierced with knife, about 1 hour. Open foil carefully (steam will escape). Cool. Peel beets; finely grate into medium bowl. Add ricotta cheese and season to taste with salt and pepper. Stir in breadcrumbs.

Sprinkle 2 smooth kitchen towels with flour. Place a wonton wrapper on work surface, keeping remaining dough covered with plastic. Place small bowl of water next to work surface. Spoon 1 teaspoon beet filling onto half of each wrapper. Dip fingertip into water and dampen edge of wrapper. Fold dough over filling, pushing out as much air as possible and pressing edges firmly to seal. Transfer to prepared towels. Repeat with remaining wrappers. (Can be prepared 1 week ahead. Transfer to rimmed baking sheet and place in freezer until frozen solid, about 6 hours. Transfer ravioli to resealable plastic bags.)
Melt butter in large skillet over medium heat and stir in poppy seeds; keep warm. Working in batches, cook ravioli in large pot of boiling salted water until cooked through, stirring often, about 2 minutes. Using slotted spoon, transfer to skillet with melted butter; toss to coat. Divide ravioli among 8 plates; sprinkle with Parmesan
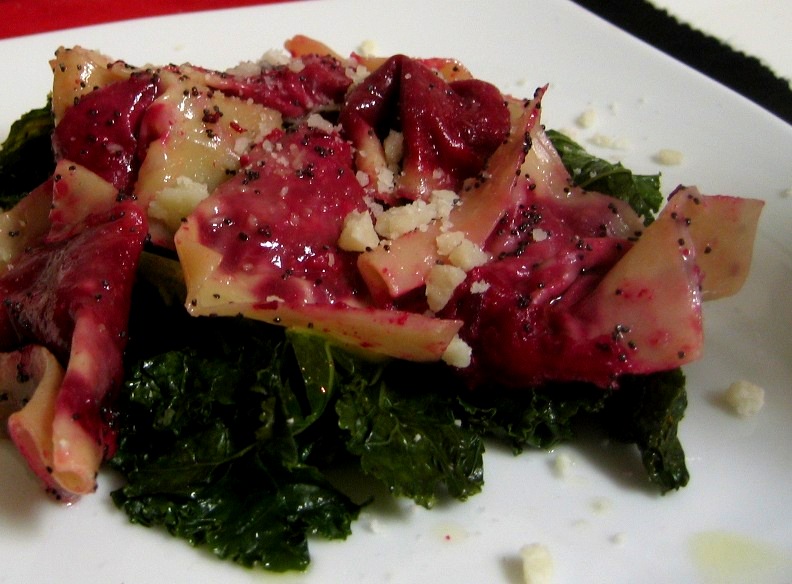
My thoughts:
The magenta of these ravioli caught my eye in a winter kitchen-scape littered with potato peels. Having only met beets last Tuesday, I’m still growing accustomed to their extroverted color. It was in the middle of preparing this recipe that I realized the full meaning of “beet red.” Why is it that the good metaphors always get overcooked in pop culture?
The recipe is very easy to follow. One person can easily do all of the prep. A large Italian family is required for the assembly and cooking of the ravioli. Also, there is not much direction in how to tell when the ravioli are done. It’s not like spaghetti that you can throw against the wall to determine if it’s al dente. My first batch, which I cooked the full two minutes, was flabby and fell apart, making my water go beet red. After some trial and error (meaning I googled “ravioli cooking time”) I discovered that ravioli are done when they rise to the surface. The only other problem I encountered was how to keep the cooked ravioli warm while finishing the rest. If left them in the butter, they got greasy. But leaving them in a bowl yielded a sticky mess – even though I drizzled in some olive oil.
But even the sticky mess couldn’t smear the beauty of the final presentation. I served the ravioli on a bed of wilted garlic-y kale and crumbled Pecorino. The bitterness of the kale along with the tang of the cheese cut the sweetness of the beets.
Gary verdict: “I’m very new to beets, and I always expect meat and/or cheese in ravioli, so it threw me off, but I was enjoying it by halfway through.”
Posted 16 years, 3 months ago. 1 comment


